Thursday, April 28, 2011

Phyllo-Wrapped Ground Beef and Vegetable Pastries


It took me a long time just to figure out what to call this recipe, because my end result was so different from what I had originally set out to cook. I wanted to make Jamie Oliver's Ground Beef Wellington, from his latest cookbook. I had one single potato to use up, some puff pastry and ground beef in the freezer already, so this looked like a great meal to put on the menu for the last week of a long month when I've already spent as much as I want to spend on groceries until my next paycheck.

When I started prepping the ingredients, however, I realized that what I had assumed to be a box of puff pastry in the freezer turned out to be phyllo dough. Not wanting to go out and buy puff pastry, I decided to work with what I had and figure it out. Thank goodness for google and food blogs!

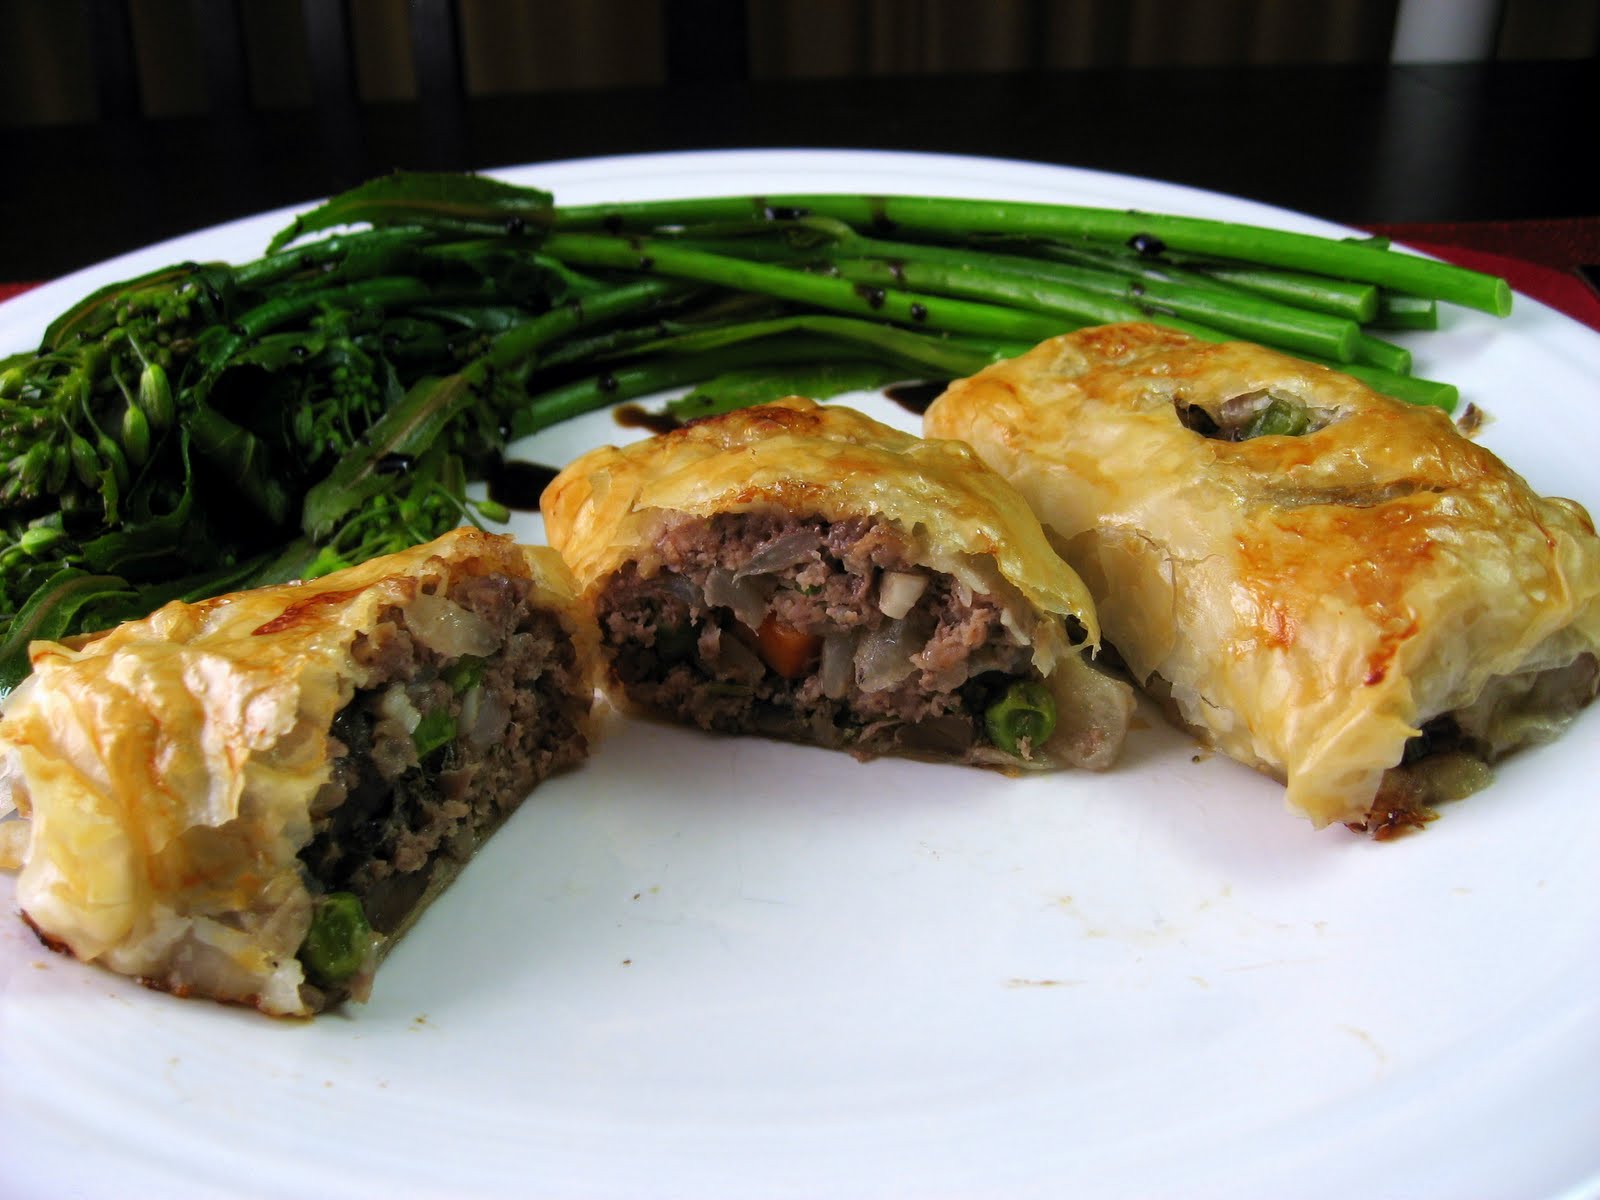
Jamie's recipe has you bake the thing for an hour. After looking up similar sounding recipes using phyllo, I didn't think that I would be able to bake that thin, flaky dough for as long as you would bake puff pastry, but I was afraid that cooking it for less time would not cook the meat thoroughly. So I opted to make mini appetizer-sized phyllo wraps to ensure that the beef cooked all the way through, and I baked them for about 30 minutes. They came out golden brown and flaky and the meat was perfectly cooked inside!

In the end, it just didn't feel right to call them beef wellingtons. Traditional beef wellington is made with a steak like beef tenderloin, covered with a layer of pate and wrapped in puff pastry. My recipe was none of those things, but was delicious!


Phyllo-wrapped Ground Beef and Vegetable Pastries
adapted from Jamie's Food Revolution, and some food blogs (this one and that one)
makes 18-20 appetizers (serves 4-6 as main course)

1 medium onion, diced small
1 carrot, diced small
1 celery stalk, diced small
1 potato, peeled and diced small
2 cloves garlic, minced
2 portabello mushrooms, cleaned and roughly chopped into small pieces like the other veggies
2 tablespoons olive oil
4 sprigs fresh rosemary, leaves removed from stalks and finely chopped
handful frozen peas
1 large egg, lightly beaten
1 pound ground beef
salt and freshly ground black pepper
About 20 sheets Phyllo dough, thawed according to package directions
Melted butter or cooking spray

Preheat oven to 350F.

Add the olive oil to a large skillet and turn the heat to medium-low. When hot, add the onion, carrot, celery, potato, garlic, and mushrooms. Saute for a minute or so, then add the rosemary. Cook for about 8 minutes, until the vegetables soften and color slightly. Add the peas and cook for another minute.


Transfer the mixture to a large bowl and let cool completely. Add the ground beef, half the beaten egg, and some salt and pepper to the vegetable mixture. Using your clean hands or a spatula, combine all ingredients thoroughly.

Remove the phyllo sheets from the box and unroll carefully. Keep the stack covered with a moist kitchen towel. Carefully remove one sheet from the pile, recover the stack. Lay the sheet flat on your working surface and brush the edges with the butter or cooking spray. Lay another sheet on top of that one and brush with more butter/cooking spray. Cut the stack in half lengthwise.


Place about 1 heaping tablespoon of the filling onto the edge of each half, leaving about a 1-inch border from the end. Roll it up like a burrito, tucking in the sides as you go. Place on a large baking sheet and cover with a most towel.


Continue rolling up your packets until you either run out of space on your baking sheet, run out of filling, or run out of phyllo sheets. You'll have somewhere between 18-20 little meat/veggies packets.


Brush the tops of the phyllo packets with the rest of the beaten egg. Cut three diagonal slits into each one. Bake for about 30 minutes, or until the phyllo is golden brown.

We served ours with steamed rabes (kale, I think? I already forgot) drizzled with aged balsamic vinegar.

Wednesday, April 20, 2011

Penne with Greens, Olives, and Feta


I am so confused. It's sunny and beautiful outside, yet it's still so chilly! I think this pasta dish reflects that gap between winter and spring that I feel like we're in right now, at least in the Pacific Northwest. It has the filling comfort of a winter meal but the spring greens and lemon keep it light and fresh.

Penne with Greens, Olives, and Feta
adapted from Bon Appetit - April 2008
serves 6

Notes: I made a few changes to this recipe. I added lemon juice, instead of just lemon peel, because I wanted extra lemon flavor. I also chose to toss the whole pot of pasta with the mixture of parsley, lemon, and garlic instead of topping each serving with it at the end. I used a mixture of arugula raab and kale raab for the greens.

1/4 cup chopped fresh Italian parsley
1 teaspoon finely grated lemon peel
1-2 tablespoons lemon juice
1 garlic clove, minced
1 large bunch greens (such as spinach, mustard greens, kale, broccoli rabe, arugula/kale raab), thick stems removed, spinach left whole, other greens cut into 1-inch strips (you want about 10 cups packed)
16 ounces penne
3 tablespoons extra-virgin olive oil
1/2 cup coarsely chopped Kalamata olives
1/2 cup crumbled feta cheese (about 3 ounces)

Bring a large pot of salted water to a boil. Add the greens and cook until bright green and tender, 1-6 minutes depending on what type of greens you are using (spinach will take about 1 minute, raabs will be 2-3 minutes, the thicker greens like kale will be closer to 5 or 6 minutes). Use a skimmer or slotted spoon to transfer the greens to a colander to drain. Set aside.

Bring the water back up to a boil and add the penne. Cook until al dente, stirring occasionally.

Meanwhile, combine the parsley, lemon peel, lemon juice, and garlic in a small bowl and set aside.

Drain pasta, reserving about 3/4 cup of the cooking liquid. Return the pasta to the pot. Add the greens and the oil and toss to combine. Stir in the olives, feta, and a little of the cooking liquid - 1/4 cup at a time - until moistened. You probably won't need the full 3/4 cup you reserved. Add the parsley mixture and toss to combine. Season with salt and pepper to taste, and serve.

Thursday, April 14, 2011

Chocolate Dessert Cups


Joe's had quite the birthday week. It started with a celebration last weekend with his side of the family, which included homemade cherry pie and chocolate cake. Next was dinner with my side which included more cake. So when his actual birthday finally came around on Wednesday, we were pretty caked out.

Then Joe randomly came across a website for making dessert cups - I don't recall where - but we thought that sounded like fun, and not super rich like a cake. I did some internet searching and came across a couple of good tutorials at Bakerella and Ghiradelli.

You take small balloons, dip them into melted chocolate, then freeze or refrigerate. Once they've hardened, you carefully let the air out of the balloons and peel them away from the chocolate shell. My balloons really wanted to stick to the chocolate so it took forever to get them out. It was quite a pain in the ass, actually. I didn't even take any photos of how I deflated the balloons because after the first cup broke I figured they would all break and I wouldn't be blogging about it anyway. Next time (and there will be a next time) I will take Bakerella's advice and lightly coat the balloons with cooking spray before coating with chocolate.


We thought the chocolate looked like hair so we had a bit of fun with this one :-)

The hands-on time for this dessert was very minimal, which is always nice. And if you approach it with the understanding that you will have some breakage and they probably won't look completely perfect, you will still be very pleased with the result.


You can fill these delicious chocolate cups with a variety of things. Fresh berries, ice cream, pudding, etc. We filled ours with homemade whipped cream and strawberries. We also had some chocolate gelato in the freezer so we filled one with that too. I think that one was my favorite.


Chocolate Dessert Cups
adapted from a variety of sources, such as Bakerella and Ghiradelli

Notes: Plan to make more cups then you will actually need, because there probably will be some breakage. For the balloons, I had a pack of assorted sizes already and had good luck with the ones that were about 3 inches long (before blowing up). I also tried some smaller ones that were about 2 inches long, but those popped almost immediately after dipping into the chocolate. I didn't measure how much chocolate I used, it was probably about 3/4 of a pound, but I had a lot of extra so you could probably get away with less if you aren't making very many cups.

You will need:

Small balloons
Good quality chocolate (I bought some fair trade dark chocolate chips in bulk at the Co-Op. Joe is not a fan of milk chocolate)

Blow up the balloons to whatever size you want for your cups and tie securely. Mine were about 4 inches in diameter. Rinse and gently dry them, and set aside.

Melt your chocolate in a double boiler (or just in a glass bowl set over a pot of simmering water like I did). Stir frequently until the chocolate is just melted. Remove from heat and allow to cool for a few minutes. You only need the chocolate to be slightly warm for this.

Holding the balloon by the tie, dip it gently into the chocolate and swirl it around to coat. Use a spatula to evenly spread it around and to neaten up the edges as needed. Make sure you have a good coating; if it's too thin it will break easily.

Set the dipped balloon onto a baking sheet (some people line it with parchment or waxed paper, I didn't). Press it gently onto the pan and hold it in place for a few seconds until it sits upright on it own.

When you've dipped all your balloons, place the pan in the refrigerator or freezer (depending on how soon you want them). Once the chocolate has hardened, gently loosen them all from the surface of the pan. Put them back in the fridge and take out one at a time to remove the balloon, so the rest stay cold.

To deflate the balloons, place a small piece of tape on the balloon near the top. Using a tack or pin, poke a hole in the balloon through the tape and let the air release slowly (the tape keeps the balloon from popping open when you poke a hole in it). Pressing the balloon down in the center with one finger, gently pry the balloon away from the sides, working your way slowly around in a circle. If you poke any holes in the cup, just fill it in with leftover melted chocolate.

To serve, fill the cups with whatever you like, such as ice cream, gelato, pudding, whipped cream, and/or fresh berries.

You can make these a day ahead, keep refrigerated until ready to serve. I say this because we did not finish all of our dessert cups the first day, so we had them again the next night, and thought they tasted just as good to us.

Thursday, April 7, 2011

Cucumber, Jicama, and Fruit Salad


We had some cheese leftover from an appetizer spread I put together for our friends this past weekend, so this week we made quesadillas for dinner. The cheese was a ridiculously spicy Buffalo Wing aged cheddar laced with jalapeno, habanero, and cayenne peppers, along with a little hot sauce for good measure. I mellowed it out a bit by adding some Monterey Jack, black beans, and diced tomatoes in the quesadilla.

I usually try to pair quesadillas with something light, like a green salad, but that can get boring. In search of a fresh idea, I pulled out one of our newer cookbooks by Mark Bittman - The Best Recipes in the World. We got it for Christmas as a gift but for some reason, we had yet to delve into it. I had a couple of mangos in the fridge that were very ripe, so I looked for a fruit salad of some kind.

The salad I chose to make required two ingredients that I was not very familiar with - jicama and papaya. My WW leader raves about jicama (pronounced "hick-a-mah") at almost every meeting, and I've tried it before at restaurants and liked it, but I've never bought one and cut it up myself. I didn't even really know what it looked like.

Case in point: Joe's phone call to me from the store: "Does jicama look like a giant potato?"...quick Google search...pause...why yes it does, as a matter of fact!


The verdict? Jicama is awesome. It's crunchy like a water chestnut, and slightly sweet like an apple. It's one of those "free" WW foods, so I'm going to remember to think of this food when I'm feeling munchy but not really hungry. It's also a good source of fiber, potassium, and Vitamin C.

Guess what, papaya is awesome as well! Yay for trying new things! I admit, I was kind of afraid to try it, in fact I made Joe try it first. First you peel it, them you cut it in half and scoop out the seeds, which to me looked a bit like capers.  I don't know why that creeped me out, but it did. The fruit itself reminded me of melon, like cantaloupe.

All in all, this salad was very refreshing and it went great with the quesadillas. It kept well in the fridge too, the jicama was still nice and crunchy a few days later when I brought some for lunch.


What's your favorite way to eat jicama? I still have half of a large one in the fridge, and I would love some suggestions! 

Cucumber, Jicama, and Fruit Salad
adapted from Mark Bittman - the Best Recipes in the World
serves 4

Notes: This salad calls for two cups of fresh fruit. I used mango and papaya, but you could also use oranges, apples, pineapples, peaches, melons - pretty much anything.

1 medium jicama (less than a pound), peeled and cut into 1/2-inch cubes
1 cucumber, peeled, seeded and diced
1/2 cup fresh lime juice
Salt to taste
2 cups fresh fruit in bite-sized pieces, peeled and seeded if necessary
Cayenne or pure chile powder, like ancho or New Mexico, to taste (the salad should be at least slightly hot)
Chopped fresh cilantro leaves, for garnish

Put the jicama and cucumber into a glass or ceramic (nonreactive) bowl. Add the lime juice and salt, toss to combine. Let sit for 30 minutes or so. Use this time to get the fruit ready.

When ready to serve, add the fruit and cayenne, toss to combine. Taste and add more spice until you are happy with the level of heat. Garnish with the cilantro, and serve.

Related Posts Plugin for WordPress, Blogger...