Showing posts with label Grilling. Show all posts

Wednesday, May 23, 2012

Summer BBQ Recipes

Since Memorial Day weekend is coming up, I thought I'd post a little round-up of some of my favorite summer recipes from the past couple of years on this blog. There's a lot of great grilling recipes here, as well as several side dishes that would be perfect to make for a BBQ or bring along to a picnic. 

Depending on where you live, not all of these ingredients may be in season just yet, but at least they give you some ideas for the summer months ahead!

Just click on the photo to go to the recipe!

Wednesday, June 8, 2011

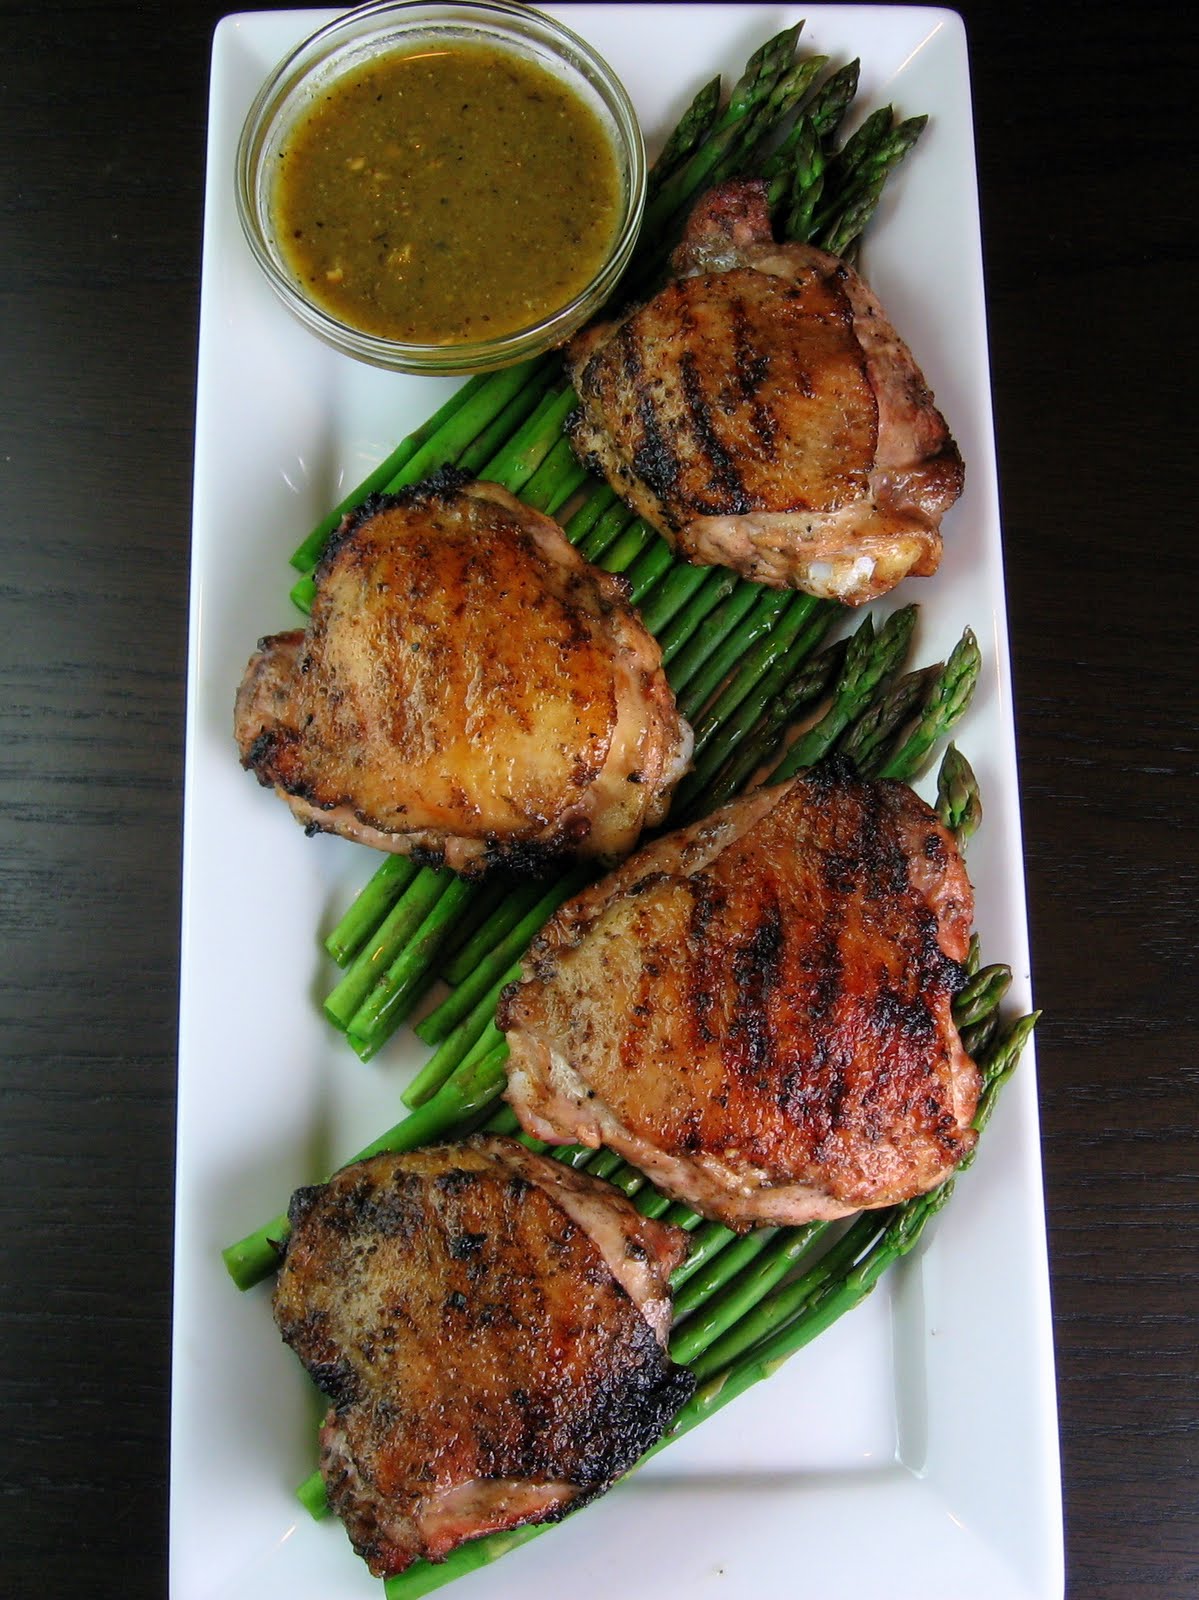
Grilled Chicken with Tangy Yucatecan Spices, Roasted Fresh Chile Salsa, and Asparagus


We've had some great weather lately, so we've been doing a lot of grilling. Joe was craving a Rick Bayless recipe, so he chose this one. At it's core, it's just grilled chicken and vegetables, except it becomes special because of the spicy garlic marinade you make for the chicken, and the use of seasonal vegetables which have the most flavor and nutrients.

The marinade reminded me of jerk spices. It had lots of garlic, along with sweet flavors from cloves and Mexican canela, which is a lot like regular cinnamon. You could just use cinnamon, but as we found out, you can get ground canela for like $1 at a well-stocked grocery store, so why not pick some up?

We also made a fresh salsa to go along with it. Joe really liked it, but it was way too spicy for me; I preferred the chicken just by itself. I might have liked the salsa better if I'd seeded the peppers, since I'm kind of a wuss like that.

We chose to use bone-in chicken thighs because humanely-raised, vegetarian-fed chicken was not on sale that week and thighs are one of the cheapest cuts. Boneless chicken breasts or thighs will work too but they will not have as much flavor as bone-in.

For the vegetable, you could use whatever is in season at the time. In the winter, try sliced potatoes (red-skinned or Yukon Gold) or beets. In the fall, use sliced zucchini or other summer squash. In the summer, sliced tomatoes would be excellent. Since it still feels like spring around here, I went with asparagus.


I've read that the best way to store asparagus is upright in a container with a bit of water, as if they were cut flowers. So I searched my kitchen and found what I think is the perfect vessel for a bunch of asparagus, though I am aware that it's probably a travesty to use an Okoberfest mug for anything but beer.


Grilled chicken with Tangy Yucatecan Spices, Roasted Fresh Chile Salsa, and Asparagus
adapted from Rick Bayless - Mexican Everyday
serves 4

For the Yucatecan Garlic-Spice Marinade
1 head garlic, broken into individual cloves (you want about 12 cloves)
1/3 cup vegetable or olive oil
6 tablespoons apple cider vinegar
pinch ground cloves
1/2 teaspoon ground black pepper
1/2 teaspoon ground cinnamon, preferably Mexican canela
1 teaspoon dried oregano, preferably Mexican
1/2 teaspoon sugar
Salt, to taste

4 chicken breast halves or 8 thighs (about 2 pounds total), skin and bones intact
1 cup chicken broth

1 pound asparagus, thick lower stems trimmed and peeled (or cut off)

About 1/2 cup Roasted Fresh Chile Salsa, for serving (recipe follows)

Cut a small slit in the side of each garlic clove, and place them all into a microwave-safe bowl. Cover with plastic wrap and microwave on high for 30 seconds. When cool enough to handle, slip off the papery husks. Put them into a running food processor one at a time, letting each one get fully chopped before adding the next. Stop the food processor, and add the remaining marinade ingredients, along with 1/2 teaspoon salt. Process until smooth.

Scrape half the marinade into a medium bowl, and the other half into a small saucepan. To the saucepan, add the broth and 1/4 teaspoon salt (or more, depending on how salty the broth is to begin with). To the bowl, add the chicken pieces and toss to coat evenly with the marinade.

Get your grill ready. If using a gas grill, heat one side to medium. Or light a charcoal fire and let it burn until the charcoal is covered with white ash and about medium-hot, then move the coals to one side.

Lay the chicken pieces skin side down on the grill over the medium-hot fire. Cook for 5-6 minutes, until nice and brown. Flip them over with tongs, moving them to the cooler side of the grill. Cook until completely tender (the juices will run clear when the meat is pierced with a fork), about 10 more minutes, maybe longer if the pieces are very large.

Meanwhile, get the asparagus ready. Put the stalks into a microwave-safe bowl with about a tablespoon of water. Cover with plastic wrap, poking a few holes in the top. Microwave on high for about 4 minutes, or until the stalks are crisp-tender. Drain the water and season with salt.

Return to the broth mixture in the saucepan, and bring to a boil. Taste and season with salt if necessary. Arrange the chicken and asparagus on a platter or individual plates, and drizzle with the sauce. Pass the salsa at the table (see recipe below).


Roasted Fresh Chile Salsa
adapted from Rick Bayless - Mexican Everyday
makes about 1/2 cup

Notes: We used jalepenos, but you can use any small hot chiles. You want about 4 ounces of chiles total.

4 medium jalepenos
4 garlic cloves, peeled
2 tablespoons fresh lime juice
Salt

Turn on the broiler and adjust the rack to the highest level. Break the stems off the peppers, cut in half lengthwise (you can seed them at this point if you want your salsa less spicy) and place them cut side down on a small baking sheet. Scatter the garlic cloves around the peppers.

Broil the peppers and garlic cloves until the peppers are soft and getting black in places. This should take a couple of minutes.

Scrape the contents of the baking sheet into a food processor or blender. Add the lime juice, plus 1/4 cup of water. Process until very smooth.

Pour into a small dish and thin with additional water if necessary. You want it to be "easily spoonable". Taste cautiously and season with salt as needed.

This salsa will keep refrigerated for about 5 days.

Thursday, September 23, 2010

Grilled Corn with Hot Lips Chili Butter


This is a kick ass recipe for chili butter.  I love it.  I want to make it every time we grill corn on the cob.  Of course, the fact that it's BUTTER means it's going to be awesome, but then you throw in that sweet/spicy mix of sugar, chili powder, and cayenne, and it just makes your lips tingle, it's that good.

I'd never grilled corn this way until I read this recipe.  You have to unwrap the corn, but leave the husks attached.  Then you pull off the silk, enclose the cob back in the husks, and run water through it.  I think you do that to keep the corn from burning as well as steam it while it grills.    

The recipe is from a little cookbook called Dressed to Grill.  I picked up this cookbook several years ago.  I haven't made too many recipes out of it, but I've liked all of them so far.  It's sort of a "girl power" grilling cookbook.  The titles of some of the recipes crack me up.  Here is a sampling of my favorites:

"Think Big and Long: Grilled Asparagus"
"Firm Thighs" (chicken thighs)
"Chauvinist Pig" (pork tenderloin)
"Who's Sari Now?" (Indian spiced kebabs)

Grilled Corn with Hot Lips Chili Butter
adapted from Dressed to Grill
Serves 6

Note: Feel free to be generous with the spice measurements.

6 ears fresh corn

Chili Butter:
4 tablespoons unsalted butter at room temperature
1/2 teaspoon chili powder
Pinch cayenne pepper
1/4 teaspoon sugar
1/2 teaspoon kosher salt
2 tablespoons minced fresh cilantro

Vegetable oil for grilling

Preheat a hot fire in a charcoal grill or preheat a gas or electric grill on high heat.

Carefully pull back the husk of each ear of corn one segment at a time without actually removing it (the very outer ones might come off, that's ok).  Remove the stringy silk as best as you can, then re-wrap the corn in the husks so it looks more or less like what you started with.  Run water into the ears of the corn, letting it run out the other end.  Drain the excess water.  Next the recipe says to "twist the husks at the top to close".  I've never had extra husk at the top to do that with, so I ignore that step.

To prepare the chili butter, combine all the ingredients in a small bowl.  Taste, adjust seasoning as needed, and set aside.

When the grill is ready, brush the grill grate with the vegetable oil.  Place the corn right over the hot fire.  Grill for about 20 minutes, turning occasionally to grill evenly on all sides.  Remove from grill, let cool a minute or two, then pull back the husks.  You can either rip the husks off completely, or tie them in a knot (this is supposed to make them look rustic.  Just for the record, I have no idea what that is supposed to look like, but I did attempt to tie mine in a knot).  Generously brush the corn with the chili butter.  Serve hot.

Wednesday, July 14, 2010

Beer Brats with Kohlrabi-Carrot Slaw


I've gotten a little out of order here. I was just so excited to share the white gazpacho I made last week that I skipped ahead. Anyway, rewind back to the the 4th of July, the quintessential day to grill. I'm not a huge fan of fireworks, so instead I focus my attention on the food. We made delicious beer brats using a recipe from Cooks Country. I like that they extensively test their methods and recipes so you can feel confident that they will work really well when you try them.


To go with the brats, I made a super easy and tasty kohlrabi and carrot slaw that my friend Amy told me about. If you've not had kohlrabi before, it's a purple or green alien-looking bulb that tastes like raw broccoli.  First, peel the carrots and kohlrabi, then slice into thin matchsticks (I used 3 medium carrots and half a large kohlrabi, because that's what I had). Then you heat up about 1 tablespoon of olive oil in a small skillet, then add 1 teaspoon or two of ground cumin and heat until fragrant. Pour this over the carrots and kohlrabi and toss to combine. Drizzle with fresh lemon juice, to taste. That's it!


Grilled Beer Brats
adapted from Cooks Country.com
serves 5

Notes: Use a light bodied lager for this recipe (like Keystone or Coors, aka, a cheap beer). Where it calls for Dijon, we used a whole grain Dijon, which I thought looked more visually appealing, but I'm sure it will taste the same either way.

2 onions, sliced into ½ inch rounds
1 ½ tablespoons vegetable oil
Fresh ground black pepper, to taste
1-12 ounce beer
1/3 cup Dijon mustard
½ teaspoon sugar
½ teaspoon caraway seeds
5 bratwurst sausages
5 6-inch sub rolls (we used whole grain hot dog buns)

If using a propane grill, turn all the burners to medium-high and heat, covered, for 15 minutes. For a charcoal grill (what we used) set up a hot, even layer of coals (I'm sure everyone with a charcoal grill has their own way of doing it, we like to use a chimney starter). Scrape and oil cooking grate.

Brush the onions with oil and season with salt and pepper. In a 13x9 inch disposable aluminum pan, whisk together the beer, mustard, sugar, caraway seeds, and ½ teaspoon pepper.

Place the disposable pan on one side of the grill and the onions on the other. Grill the onions until lightly charred, about 6-10 minutes. Transfer the onions to the pan with the now simmering beer mixture and put the sausages in their place on the grill. Grills those until browned, another 6-10 minutes. Transfer the sausages to the pan, cover grill, and cook until the sausages are cooked through, about 15 minutes. Return the sausages to the grill for about 4 minutes to let them get nice and charred. Transfer the sausages to a plate and tent with foil.

Let the beer mixture simmer on the grill, uncovered, for about 5 more minutes. When the onions are tender and the sauce has thickened slightly, it's done.

To serve, place bratwurst in rolls and spoon the sauce and onions over the top.     

Friday, June 18, 2010

Spicy Grilled Shrimp, Potatoes, and Bok Choy


We had some lovely weather last weekend, though it left entirely too quickly.  I'm beginning to think we'll be stuck in this "Juneuary" dreariness forever.

Sigh.

However, we did make use of the evening by cooking our entire meal outside.  We had some purple potatoes and bok choy from the CSA which we tossed with olive oil, salt, and pepper.  We bought some shrimp and made a spicy marinade ala Mark Bittman.  Then we just put everything on the grill.  It was exquisite.  We finally got to use our hot smoked paprika too!  The shrimp had some kick to it, but I didn't think it was super spicy, just enough to be really flavorful.


While waiting for the coals to heat up, I enjoyed a beer and a good book.  Seriously, give Sherlock Holmes a try if you've never read it, I'm really liking it!


Spicy Grilled (or broiled) Shrimp
adapted from Mark Bittman - How to Cook Everything
Serves 4

1 large clove garlic, peeled
1 tablespoon coarse salt
1/2 teaspoon cayenne
1 teaspoon paprika (we used hot smoked paprika and it was awesome
2 tablespoons extra virgin olive oil
2 teaspoons freshly squeezed lemon juice
About 1 1/2 pounds shrimp, 20-30 per pound, peeled, rinsed, and dried
Lemon wedges for serving

Heat a charcoal or gas grill or broiler until hot, and put the rack as close to the heat source as possible.  You are going to want to be able to cook these shrimp quickly so they get nice and charred but still juicy.

Mince and mash the garlic into the salt on a cutting board with a chef's knife until it forms a paste.  Transfer to a small bowl.  Add the cayenne and paprika, then the olive oil and lemon juice.  Hopefully it is still relatively paste-like.  Mine was a little liquidy, but it still works.  Smear this all over the shrimp.

Grill or broil the shrimp, turning once, for 2-3 minutes on each side.  Serve immediately or at room temperature, with lemon wedges on the side.

Sunday, June 13, 2010

Chicken Adobo


Once or twice a year, we splurge and buy a whole chicken.  It's a splurge because of course it has to be a free range, organic chicken, and those don't come cheaply (but that's the way it should be).  Since we're paying more and it really is a rare occasion, we go all out and try to make an awesome dinner out of it.  It always makes plenty for leftovers too, so we get about 3 meals out of that one bird.  We also make stock out of the carcass, so that's another couple of meals as well.

This time Joe pretty much ran the kitchen, I just took some pictures and suggested roasted asparagus for a side dish.  He chose to make Mark Bittman's Chicken Adobo.  It's a dish from the Philippines, and it's basically chicken that is poached in a mixture of soy sauce, rice vinegar, and coconut milk.  Then the chicken pieces are finished by roasting, grilling, or broiling, while the poaching liquid is simmered on the stove until it has reduced into a delicious sauce that is later served over the chicken and some rice.

I can hardly find words to describe how good it was.  The flavors of the soy sauce and coconut milk intensified as they reduced and the result was incredible.  This is going in the books as my favorite chicken recipe of all time!  The next time you find yourself with a whole chicken, I highly recommend this recipe.

We wanted to eat this on Sunday, but we also wanted time to make the chicken stock before the busy week got underway, so we started it on Saturday and refrigerated it overnight (see instructions in recipe below).  This way Joe could make the stock on Saturday as well (in the past we don't always get around to making the stock if we don't make it right away, so this worked out nicely).  Then on Sunday, all we had to do was grill the chicken, simmer the sauce, and make rice.


Chicken Adobo
adapted from Mark Bittman - How to Cook Everything
Serves 4-6

1 cup soy sauce
1/2 cup white or rice vinegar
1 tablespoon chopped garlic
2 bay leaves
1/2 teaspoon freshly ground black pepper
1 1/2 cups coconut milk (this is optional, but I think it really adds a lot of flavor and would not skip it if I were you)
1 whole chicken, 3 to 4 pounds, trimmed of excess fat and cut into 8 pieces, or any combination of parts

In a large saucepan or dutch oven (it has to be large enough to hold all the chicken in one layer) combine the soy sauce, vinegar, garlic, bay leaves, pepper, 1 cup water, and half the coconut milk.  Cover and bring to a boil over high heat.  Add the chicken and reduce the heat down to medium-low.  Cover again and cook for about 20 minutes, turning once or twice, until the chicken is almost done.

At this point, you may either proceed with the recipe or refrigerate the chicken in this liquid for up to a day (skim the fat before reheating).

Heat the oven to 450 F, or heat a charcoal or gas grill or broiler to moderate heat and put the rack about 4 inches from the heat source.  Take the chicken pieces out of the liquid and dry them off a bit with paper towels.  Grill, broil, or roast the chicken until brown, crisp, and hot, turning as necessary, about 10-15 minutes.

Meanwhile, boil the sauce, along with the remaining coconut milk, over high heat until it has reduced to about one cup.  Discard the bay leaves.  Keep warm until the chicken is ready.

Serve the chicken over rice and pass the sauce at the table.

Sunday, June 6, 2010

Ginger-Glazed Grilled Carrots, Pea Shoots, Wild Rice Salad


It's the first week of our summer CSA!  This week we got the most beautiful basket of produce: fresh lettuces, spinach, scallions, mint, pea shoots, radishes, carrots, purple potatoes, and blueberry preserves.

The recipe ideas in their weekly newsletter looked really good too, so tonight I made one of them using the carrots and the pea shoots.  You basically marinate the carrots in a mixture of garlic, ginger, lime juice, brown sugar, and olive oil, then grill them whole.  Then you just make a quick salad out of the pea shoots and serve the carrots over the top.  I loved this method of cooking carrots!  Also, I forgot that pea shoots are totally edible, so this reminded me that I can be pruning my pea plants that are growing outside and add the pea shoots to my salads.

I also made a really yummy rice salad using a Mark Bittman recipe.  This recipe was a keeper!  Joe thought it was awesome, and I want to keep it in mind the next time I need to bring something to a picnic or potluck because it can be made ahead.


Ginger-Glazed Carrots and Pea Shoot Salad
adapted from Gathering Together Farm CSA newsletter
Serves 4

1 bunch carrots, tops removed, washed and peeled
1 bunch pea shoots
1 garlic clove, minced
1 tablespoon grated fresh ginger
Juice of 1 lime
2 tablespoons light brown sugar
Dash of salt and freshly ground black pepper
2 tablespoons extra-virgin olive oil

Leave the carrots whole, and put them into a shallow bowl or plastic bag.  In a small bowl, combine the garlic, ginger, half of the lime juice, brown sugar, salt, pepper, and half of the olive oil.  Pour this mixture over the carrots and toss well.  Allow this to marinate for at least 30 minutes or overnight.

You can grill these carrots on an outdoor grill, or indoors on a grill pan or cast-iron skillet.  Heat the grill or grill pan to a high flame/high heat.  Place carrots on the rack or in the pan.  Cover and cook for 3-5 minutes.  Remove cover, flip carrots carefully.  Cook another 2-4 minutes or until the largest carrot is nice and charred on both sides.

Meanwhile, chop or tear the pea shoots into smaller pieces if desired.  Toss with the remaining tablespoon of olive oil and the other half of the lime juice.  Sprinkle with salt and pepper.

Slice the carrots into 1-inch pieces if desired, or serve whole.  Pile on top of the pea shoot salad and serve immediately.

Wild Rice Salad
adapted from Mark Bittman - How to Cook Everything Vegetarian
Serves 4

3-4 cups cooked wild rice, cooled
1/4 cup chopped scallion
1/2 cup dried blueberries, cranberries, or cherries (or a combination)
1/2 cup chopped almonds
1/2 cup extra-virgin olive oil
1/4 cup freshly squeezed lemon juice
Salt and lots of freshly ground black pepper
1 large shallot (about 1 ounce), cut into chunks
1/2 cup chopped fresh mint

In a large bowl, add the rice, scallions, dried berries, and almonds.  Toss with a fork to break up the rice and mix all the ingredients.

To make the vinaigrette, put the oil and lemon juice into a blender or small food processor.  Sprinkle with salt and lots of pepper.  Blend for about 30 seconds to emulsify.  Add the shallot chunks and pulse a few times until the shallot is minced within the dressing.  Taste and adjust seasoning if necessary.

Drizzle the vinaigrette over the rice mixture and gently toss to combine.  Stir in the mint, taste one more time for seasoning.  Serve at room temperature or refrigerate for up to a day.  Bring the salad back up to room temperature before serving.
Related Posts Plugin for WordPress, Blogger...